
Backyard beekeeping is an increasingly popular pursuit among farming enthusiasts and nature lovers. It offers a unique opportunity to engage with the environment, support local ecosystems, and enjoy the sweet rewards of home-harvested honey. If you’ve ever found yourself captivated by the fascinating world of bees, you’re not alone. As someone who has delved into this rewarding hobby, I’d like to share insights drawn from personal experience and expert knowledge — with a focus on keeping bees successfully here in Canada — to help you start your beekeeping journey.
Before You Start: Registration and Local Rules
In Canada, honey bees are treated as livestock and regulated by the provinces. Almost every province requires you to register as a beekeeper, even if you only have one hive. Registration lets provincial apiarists track disease, send you outbreak alerts, and inspect hives when needed. Your city may have its own rules on top of that.
| Province / city | What’s required |
|---|---|
| Ontario | Anyone who owns honey bees needs a certificate of registration from the province’s Apiary Program. Under the Bees Act, hives can’t sit within 30 m of a property line next to a home, community centre, park or other public space, or within 10 m of a road. |
| Alberta | Registration is mandatory and free, and must be renewed every year (it expires June 29). You also need to register if you only own used beekeeping equipment, since old boxes and frames can carry disease. |
| British Columbia | Every beekeeper and every hive location must be registered with the province, whether you keep one colony or thousands. |
| Calgary | A city beekeeping licence for each property, plus an approved training course before you apply. No more than two colonies without the city’s approval. Provincial registration is still required. |
| Vancouver | Beekeeping is allowed on qualifying residential and commercial properties and in community gardens. City guidelines strongly encourage taking a course or joining a bee club first. |
| North Vancouver (City) | Up to 2 hives, kept behind the house, at least 7.5 m from neighbouring property lines. |
Ontario’s setback is the strictest in the country, and most city and suburban lots can’t meet it. A Hamilton beekeeper was fined $2,000 in 2024 for keeping hives too close to a property line. The Ontario Beekeepers’ Association has asked the province to remove the rule. Until that happens, check your lot carefully. On a small lot, your best options may be keeping your hives on a friend’s farm or joining a community apiary.
Understanding Bee Biology
Before you even think about setting up your hive, it’s crucial to understand the biology and social structure of honey bees. Honey bees, particularly the species Apis mellifera, live in complex societies made up of three types of bee:
👑 Queen
The colony’s only egg-layer. At the peak of the season she can lay up to about 1,500–2,000 eggs a day. Her scent (pheromones) holds the colony together.
🐝 Workers
Workers change jobs as they age: cleaning cells, nursing larvae, building comb, guarding the entrance, and finally foraging for nectar, pollen, water and propolis (a resin they collect from plants).
🛸 Drones
Males with no stinger. Their only job is to mate with a young queen from another colony. Workers push them out of the hive in fall.
Understanding this social structure is vital for effective hive management. For instance, if your hive becomes too crowded, the colony may decide to swarm: the old queen leaves with roughly half the workers to find a new home. You can usually head off swarming by spotting the signs early (a crowded brood nest, and queen cells along the bottoms of frames) and giving the bees more space or splitting the colony.
Having a strong grasp of bee biology not only improves your hive management but also deepens your appreciation for these remarkable insects. In my own experience, watching the interactions inside the colony can be mesmerizing, and it tells you a lot about what the bees need.
Choosing Your Hive Type
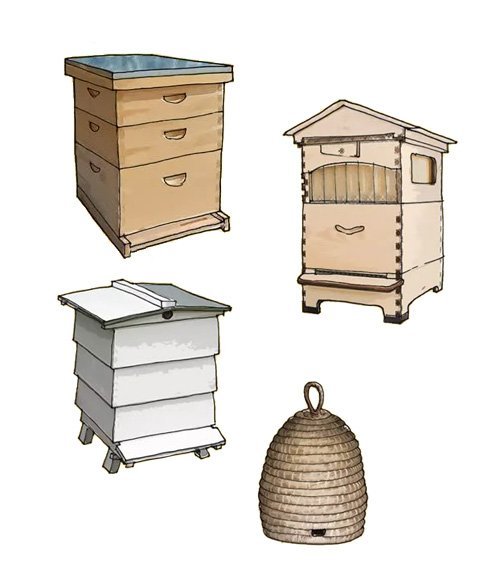
Once you’ve familiarized yourself with bee biology, the next step is choosing a hive. For beginners in Canada, the Langstroth hive is the clear standard. Its removable frames make inspections and honey harvesting easy, and its parts are interchangeable with what every supplier, club and mentor uses. When I first set up my Langstroth hive, I felt a mix of excitement and apprehension. I painted it a bright colour, worried later that I’d chosen wrong, and then learned that hive colour matters far less than I’d feared. Bees can’t see red, but they do use colours and markings to find their own hive. Lighter paint keeps a hive cooler in summer, and painting neighbouring hives different colours helps bees return to the right one.
| Langstroth | Top-bar | Warré | |
|---|---|---|---|
| Design | Stacked boxes with removable frames | One long horizontal box; bees hang comb from wooden bars | Stacked boxes with top bars; new boxes added underneath |
| Best for | Beginners, honey production, getting help from mentors | Beekeepers who can’t lift heavy boxes; small honey harvests | A hands-off, “natural” approach |
| Heavy lifting | Yes. A full deep box can weigh 30+ kg | No. You lift one comb at a time | Yes, when adding boxes underneath |
| Honey yield | Highest | Lower (the comb is crushed to harvest) | Moderate |
| Inspections & mite checks | Easiest | Fragile comb can break, especially in cool weather | Hardest to inspect |
| Canadian winters | Proven; easy to wrap and insulate | Harder. Bees can get stranded away from their food along the long box | Good in theory, but less tested here |
| Buying bees & parts | Nucs (starter colonies) and gear are everywhere | Nucs are hard to find | Nucs are hard to find |
Consider your space, your climate and how much you can comfortably lift. Visiting local beekeepers to try their hives is the best way to decide.
Preparing Your Location
Where you put the hive matters just as much as which type you choose. Here’s a placement checklist:
- Morning sun. A south- or southeast-facing entrance warms the hive early and gets foragers out sooner. Afternoon shade helps in hot summers.
- Wind shelter. A fence, hedge or building on the north and west sides blocks our prevailing winter winds.
- A flyway barrier. In town, a fence or hedge about 1.8 m (6 ft) tall in front of the entrance forces bees to fly up and over people’s heads. Many municipal bylaws require one.
- Water nearby. Give the bees a shallow dish with stones or floating corks to land on, so they don’t visit your neighbour’s pool or birdbath.
- Raised off the ground on a stand, to keep the hive dry and easier on your back.
- Away from traffic. Face the entrance away from paths, patios and property lines.
- Bear and skunk protection. In rural areas, especially in BC, Alberta and Northern Ontario, an electric fence is often essential.
I found that placing my hive near a flowering garden gave my bees plenty to forage nearby, and it’s a joy to watch them working the flowers. Planting native species that bloom at different times through the season keeps a steady food supply coming and supports local biodiversity.
| Season | Bee-friendly plants that do well across much of Canada |
|---|---|
| Early spring | Willows (pussy willow), crocus, maples, dandelion (leave some in the lawn!) |
| Late spring | Fruit trees, serviceberry (Saskatoon), chokecherry, lilac |
| Summer | White and yellow sweet clover, alfalfa, wild bergamot, anise hyssop, borage, basswood (linden) |
| Late summer & fall | Goldenrod, asters, fireweed, sunflowers, sedum |
Acquiring Your Bees
Once your hive is ready and in place, it’s time to get your bees. There are three main ways to do it:
| Option | What you get | Pros | Cons |
|---|---|---|---|
| Nucleus colony (nuc) | 4–5 frames with a laying queen, brood, honey and bees | Fastest start; you can see the queen is already laying; local nucs are adapted to our climate | Costs the most; sells out early, so order in winter |
| Package | About 1 kg of loose bees with a caged queen | Cheaper; easy to install; good practice for beginners | The bees start with no comb or brood, so the colony builds up slowly; queens are often imported |
| Swarm | A cluster of bees you catch yourself | Free; often vigorous | Unpredictable; unknown genetics and health; not for your first hive |
When I started, I chose a package: a queen and several thousand workers. I remember the mix of excitement and nerves as I opened the package to introduce them to their new home. I followed the instructions carefully and released the queen, and to my surprise the bees formed a swirling cloud around me, as if welcoming me into their world.
Tip: Start with two hives if you can. If one colony loses its queen or gets weak, you can borrow a frame of eggs or brood from the other, and comparing the two will teach you twice as fast.
Local beekeeping clubs and associations are great places to buy bees, and they run workshops where you can learn from experienced beekeepers. That kind of community support is invaluable in your first few seasons.
- Humble Bee – Ontario’s Beekeeping Supply Store – Local Honey & Beeswax
- Ontario Beekeepers’ Association – courses, local clubs and the Tech-Transfer Program
- Canadian Honey Council – national industry news and provincial association contacts
Essential Gear and Startup Costs
| Item | Why you need it | Typical cost (CAD) |
|---|---|---|
| Hive (bottom board, 2 deep boxes, frames, inner and outer covers) | The colony’s home; two deep boxes is the usual Canadian setup for wintering | $300–$500 |
| Honey supers (2–3) + queen excluder | Boxes where the bees store the honey you’ll harvest | $150–$300 |
| Bees (nuc or package) | — | $250–$400 |
| Veil or jacket, gloves | Protection and confidence | $80–$200 |
| Smoker, hive tool, bee brush | Calm the bees and pry apart frames | $60–$120 |
| Feeder | Sugar syrup in spring and fall | $20–$50 |
| Mite testing kit + treatments | Non-negotiable in Canada | $50–$100 / year |
| Winter wrap or insulation | Helps the colony survive our winters | $40–$100 |
Regular Hive Maintenance
Regular inspections are vital for a healthy hive. I remember my first one vividly: my hands were shaking as I lifted the lid. Spotting the queen laying eggs and the workers bringing in nectar was unforgettable. I also met my first problem, a few wax moth larvae. I panicked at first, but I soon learned it’s a common issue. Wax moths usually take hold when a colony has more comb than bees to guard it, so a strong colony and removing extra empty boxes go a long way.
Inspect every 7–10 days in spring and early summer (swarm season), and every 2–3 weeks after that. Work on warm, calm days, ideally above 15 °C, and don’t open the hive in winter.
What to check at each inspection
- Queen right? You don’t need to see her. Fresh eggs (tiny upright “grains of rice” in the cells) mean she was there within the past 3 days.
- Brood pattern. Look for solid patches of capped brood. A spotty pattern or sunken, greasy or perforated cappings can mean disease, so take photos and contact your provincial apiarist.
- Food stores. Check for honey and pollen around the brood nest. Feed syrup if stores are light, especially in spring and fall.
- Space. If the bees cover about 7 of 10 frames, add a box.
- Swarm signs. Look for queen cups with eggs or larvae in them, or peanut-shaped queen cells along the bottom edges of frames.
- Pests. Look for varroa mites, small hive beetles and wax moth, and keep notes after every inspection.
Varroa: the number-one threat
Ontario research shows that poor varroa mite control is the main reason colonies die over winter. Canada’s national winter losses have been above the long-term average every year since 2022:
You can’t manage mites you don’t measure, so learn to do an alcohol wash. Scoop about ½ cup (around 300 bees) from a brood frame into a jar of rubbing alcohol or windshield washer fluid and shake it. Count the mites that fall out and divide by 3 to get mites per 100 bees. Ontario’s Apiary Program recommends treating when counts pass these levels:
| Test method | Treat in May if more than… | Treat in August if more than… |
|---|---|---|
| Alcohol wash | 1 mite per 100 bees | 2 mites per 100 bees |
| Sticky board (24-hour natural mite drop) | 3 mites | 9 mites |
Use only treatments registered for honey bees in Canada. Common ones are oxalic acid, formic acid pads and thymol products. Follow the label, especially on temperature limits and whether honey supers can stay on, and rotate between products with different active ingredients so mites don’t build up resistance. Combine treatments with good management (Integrated Pest Management) such as screened bottom boards, drone-brood removal and brood breaks. Cornell’s Integrated Pest Management (IPM) guide is an excellent overview.
American foulbrood and other serious bee diseases must be reported to your provincial apiarist. If you see sunken, perforated cappings, or larvae that pull out like brown, ropey threads when you poke them with a matchstick, close up the hive, don’t move any equipment, and call your province’s apiary inspector.
A Canadian Beekeeping Year
Our short season and long winter set the rhythm. Here’s a typical year in southern Ontario and the Prairies; on the BC coast everything starts about 3–4 weeks earlier.
A colony in a cold region generally needs 30–40 kg (65–90 lb) of honey or syrup stores to get through to spring. As with chickens, moisture is a bigger danger than cold: condensation dripping onto the cluster can kill it. Insulate the top, give damp air a way out through an upper entrance, and tilt the hive slightly forward so water drains out. Many Prairie commercial beekeepers winter their colonies indoors in climate-controlled buildings. Backyard beekeepers usually winter outdoors in well-wrapped double-deep hives.
Embracing Challenges and Learning Through Experience
Backyard beekeeping is undeniably a learning journey, full of both rewards and challenges. Mistakes are bound to happen, and it’s important to accept them as part of the process. I vividly remember one summer when my hive swarmed, and I felt a wave of panic. After talking with local beekeepers and changing how I managed the hive, I learned to prevent swarms, and eventually grew from one hive to several.
Common beginner mistakes
- Skipping mite tests (“my bees look fine”)
- Treating for mites too late, in September or October
- Adding space too late in spring, which leads to swarms
- Harvesting too much honey and leaving too little for winter
- Opening the hive too often or in cold weather
- Not registering with the province
Habits of successful beekeepers
- Testing for mites in spring, summer and fall
- Keeping notes after every inspection
- Running at least two colonies
- Joining a club and finding a mentor
- Getting replacement equipment ready before the season starts
- Being patient: the first year is about building the colony, not honey
Taking beekeeping workshops and joining local associations has added a great deal to what I know and given me a network of fellow enthusiasts. Learning from others is invaluable, especially with common challenges like disease management or honey extraction. I’ve also found that mentoring new beekeepers has strengthened my own understanding and built a real sense of community around this rewarding hobby.
Enjoying the Sweet Rewards
One of the most gratifying parts of backyard beekeeping is harvesting your own honey. After a season of careful work, I was thrilled to collect my first batch. Extracting the honey, bottling it and sharing it with friends and family brought me immense joy.
| What to expect | Typical amount |
|---|---|
| First year with a nuc or package | 0–10 kg. Many experts suggest leaving all of it for the bees. |
| An established colony, Ontario or BC | 20–40 kg in a good year |
| An established colony, Prairies (canola and clover country) | Often 50+ kg in a good year |
Planning to sell your honey at the farm gate or a farmers’ market? Check your province’s labelling and food safety rules first. Ontario, for example, has specific requirements for honey.
As you start out, remember that patience is key. Each season brings new lessons and experiences that will deepen both your knowledge and your appreciation for these remarkable insects.
Final Thoughts
Backyard beekeeping is a fulfilling way to connect with nature and do some good for the environment. Register with your province, understand bee biology, choose the right equipment, pick your hive location carefully, take varroa seriously, and plan for winter from day one. Do that and you can raise a thriving colony.
If you’re ready to take the plunge, I encourage you to seek out local resources, connect with fellow beekeepers, and enjoy the sweet rewards of this incredible journey. Happy beekeeping!
Canadian resources:
Ontario – Summary of beekeeping regulations
Ontario – Treatment options for honey bee pests and diseases
Ontario – Annual apiculture winter loss reports
Alberta – Beekeeper registration
BC – Apiculture staff, inspections and registration
Canadian Association of Professional Apiculturists – Colony loss reports
Ontario Beekeepers’ Association
Canadian Honey Council
City of Calgary – Urban beekeeping and licensing
City of Vancouver – Honey beekeeping
Further reading:
Cornell Pollinator Network Resources
Beekeeping Basics | Pollinator Network – Cornell CALS